Social Icons

Showing posts with label Home Remodel. Show all posts

Friday, April 4, 2014

DIY: Pot Rack

Kitchens are one of the most important rooms in any house and people often argue that they are not big enough and that is definitely the case for me. It's not that my kitchen isn't a perfectly acceptable size given the total living space of my condo but I have a unique opportunity to purchase high quality kitchen tools at a significantly reduced price from my part time job. It is a result of that circumstance that I have filled my kitchen with all sorts of great kitchen tools. My large half round hanging pot rack quickly filled to capacity with Ceramic Titanium Non-Stick Scanpan CTX Cookware.

That pot rack however wasn't large enough to hang all my new cookware. I ended up with a few large pieces that just didn't fit neatly and were too nice to be hidden away in a cabinet. It left me wondering if I should replace my current pot rack with something larger or add an additional one.

This Old House Concept
I decided after researching that I really didn't have the room for a larger version of the one I already had and I didn't have the space to add additional rack. I decided instead that my only option was a bar style rack mounted to the kitchen side of my breakfast bar wall. I searched high and low but found nothing that I thought would work for me at a reasonable price point. While looking I did come across an interesting DIY pot rack project on thisoldhouse.com. The scale was too large for me but the idea was perfect.

With the concept in mind I set off to Home Depot/Lowes to gather the materials necessary to make the simple bar of galvanized pipe. I picked up a 36" galvanized pipe, 2 Street-90 elbows and 2 flanges. I also picked up a small box of heavy duty stainless steel screws I would need to secure it safely to the wall and 4 heavy duty s-hooks to hang my cookware from. I learned quickly that it wasn't an inexpensive project. When I made it to the self checkout I realized quickly that I had over $70 worth of parts.

I got home and assembled my planed configuration. When I held it up to the wall I couldn't have been more pleased with the size, scale and look of my DIY pot rack. After some quick measurements I marked the wall and screwed the flanges to the wall. I hung my extra cookware and was very pleased with the final result. What do you all think?


Thursday, August 8, 2013

Air Conditioner Drip Tray Repair: Take 2

While I love my condo there are a few things that have been regular issues over the past 11 years that I have called it home.  The air conditioning/heating system being the biggest of those annoyances.

My building uses a forced Hot/Cold water system to provide heat and air conditioning to the 88 units. One of the disadvantages of such a system is that when its humid the air conditioner creates a fair amount of condensation. That condensation drips into a condensate pan and drains outside.

Built in 1963 and now 50 years old somethings are begining to require attention. Particularly the condensate pans. They are galvinized steel and have tabs cut out of them to allow them to be attached to the air handlers. To prevent leaks they were filled with a rubberized tar and over time that tar has dried and cracked leaving the pan no longer water tight.

Sadly you discover this is the case when you find water on your floor. With parquet floors that isn't a fun thing to discover and often the floor fights back. I repaired one of my condensate pans almost a year ago so its time for take 2. It created a significant problem and required the rebuilding of the entire enclosure surrounding it.

Thankfully I work for a manufacturing company and have tools and resources to help me repair my drippy pans. A freind of mine at work is a mirical worker and devised a plan to make blanks that would cover the holes at the bottom and when pressed together with a peice of rubber between them make a water tight seal.

I plan to reseal the whole pan with a new rubberized spary but since the disruption has halted the use of my air conditioner in the bedroom. Since it takes a few days for the rubber spray to dry thoroughly, I am going to install it as is and when the fall weather arrives I will reassemble after coating the pan.

Thankfully this time the damage was far less and really I only needed to give the floor a little attention after repairing the drip pan.


Friday, July 12, 2013

Task 63 - New antique re-purposed coffee table

I went to the Brimfield Flea Market / Antique Show's this past weekend with two friends and had one goal in mind. I needed a coffee table base for a granite top that I had acquired. I had decided before going that I wasn't going to spend anymore then $300 in cash on any base but with over 5,000 dealers I was hopeful that one would have something that would do the job that would fit within my price range.

We saw lots of unique items including old recycled tin ceilings made into art. We also saw lots of garbage mixed in with a few pieces of fine antiques. It's a great show and offers something for everyone at any budget. After finding lots of vendors who has something close to what I wanted but nothing that was perfect I was on the verge of giving up when I saw a circular gear that would have been perfect. I asked the vendor what he was asking only to be disappointed that he wasn't selling that piece because he had actually just bought it for a project of his own.
As I saw it at Attic Turn Over's Booth
Annoyed that he would leave it out with everything else if it wasn't for sale I walked away from him while he was trying to suggest other items he had that might work for me. I had already scanned his whole booth and nothing else piqued my interest. As we cut back around to head back towards the main path we ran into the Attic Turn Over's booth.

Amongst all the booths with piles of junk stacked up I was delighted to find a booth where not only did they have great products but they set the large booth up like you would expect to find a shop in SOHO or Boston. They mostly had larger furniture made from re-purposed factory items but hiding along one of the walls was this great rectangular table. 

As I saw it at Attic Turn Over's Booth
It looked copper and after nearly buying a $2650 copper table at Arhaus I was intrigued.   After shifting a table out of my way I discovered that the table was actually solid steel and weighed about 300lbs. It was definitely a cool table and I wondered what it has once been.

Having mainly decided to replace my existing table due to its cocktail table height I quickly measured and was pleased to find that it was a much more appropriate 18in. I hadn't planned to buy a whole new table and really only wanted a base but I asked the vendor what he was asking for the table. When I heard the $450 price tag I figured it wasn't meant to be since I had set myself a hard limit of $300 for the day. I walked away from the table and checked out all his other items and found a few more tables with bases that I liked.

At home and as seen from above
In a second attempt to make a purchase in his booth I inquired if he was willing to separate the base and top from this new table. He asked what I was looking for and I explained that I was really only looking for a base and had set myself a price limit and that both tables were over my limit. As much as I could tell he wanted to sell me something he explained that his table bases in most cases were welded to the tops.

Again I walked away and as we were about to leave his booth he walked over and suggested that the guy next had a few items that would work for me. Having just been over there and disappointed that not everything was for sale I politely told him I had already been and that honestly his stuff was better. Having gotten a smile and a thank you he seemed even more friendly then he had before and spent a fair amount of time explaining how his products came together.
In a last effort I asked him what his best price was on the rectangular table even though I was only looking for a base I explained that I really liked the table and it was a perfect match for my space. I didn't hold out much hope since I didn't think it was reasonable that he would go from $450 to $300 for the table. That would have been a 33% decrease in price. I figured a reasonable discount would cap off at 20% and the best I could have hoped for was $375.

Much to my surprise he said the lowest he would go on that table was $300 since it had been a slow day and the workmen were not looking forward to having to reload the very heavy table back onto the truck. I figured it was a sign I should buy the table since that was exactly what I had withdrawn from the bank and we made a deal.

With that I handed him $300 in cash and I got a receipt and we made plans to pick it up on our way out. While he was writing up the paperwork he explained that it was an old leveling table that engineers used as a true point in quality assurance. I was familiar since I worked for a company that manufactured products and we have our own QA department with a table while much larger serves the same purpose.

When we returned later on he had it all wrapped up and ready to go and even graciously gave me the blanket to wrap the table for the trip back home when he discovered we didn't have much in the way to wrap it up.

At home and as seen from the side
I wish I had more money and more furniture needs because I would have surely purchased more from him. He was a pleasure to work with and was more then fair with the pricing. While he is based in Ohio he said he comes to every Brimfield and I plan to stop back next time and see what new items he might have.

I couldn't wait to get it home and am even more pleased with my purchase then I thought I would be. I am going to get a piece of glass cut for the top just to protect the finish from anything or anyone.


Friday, October 5, 2012

Home Improvement - Breakfast Bar

Installing a Breakfast Bar

I rarely entertain and almost never throw dinner parties and as a result I got rid of my 6 seat dining room table almost a year ago. With no formal place to eat I found myself having meals on my coffee table. This is ok when it is just me but once in a while I have another person over for dinner. Having a guest eat at the coffee table is less then ideal.

Before remodelling my kitchen I used to have breakfast bar but it didn't make the cut and was removed. Not really interested in having a big table that takes up lots of space again I decided to revive the idea of a breakfast bar.

I have over remodeled my condo and am already at a point where I may not see some of what I have invested returned when I sell as long as housing prices remain low. Not wanting to compeat with the granite in the kitchen and cost being a factor I decided to look at alternative materials. Everything seemed to be almost the same price as granite. I didn't want to spent the $600 they were looking for to complete the job.

My friend Chris being a contractor and landlord regularly watches those home improvment shows like "design on a dime" and in one episode they featured a home with a similar problem. They had a perfect solution and he suggested I do the same. Their solution was a low cost butcher block counter from Ikea that they cut to fit the space. This seemed like the perfect plan and at $129 for the counter fit the budget for the job.

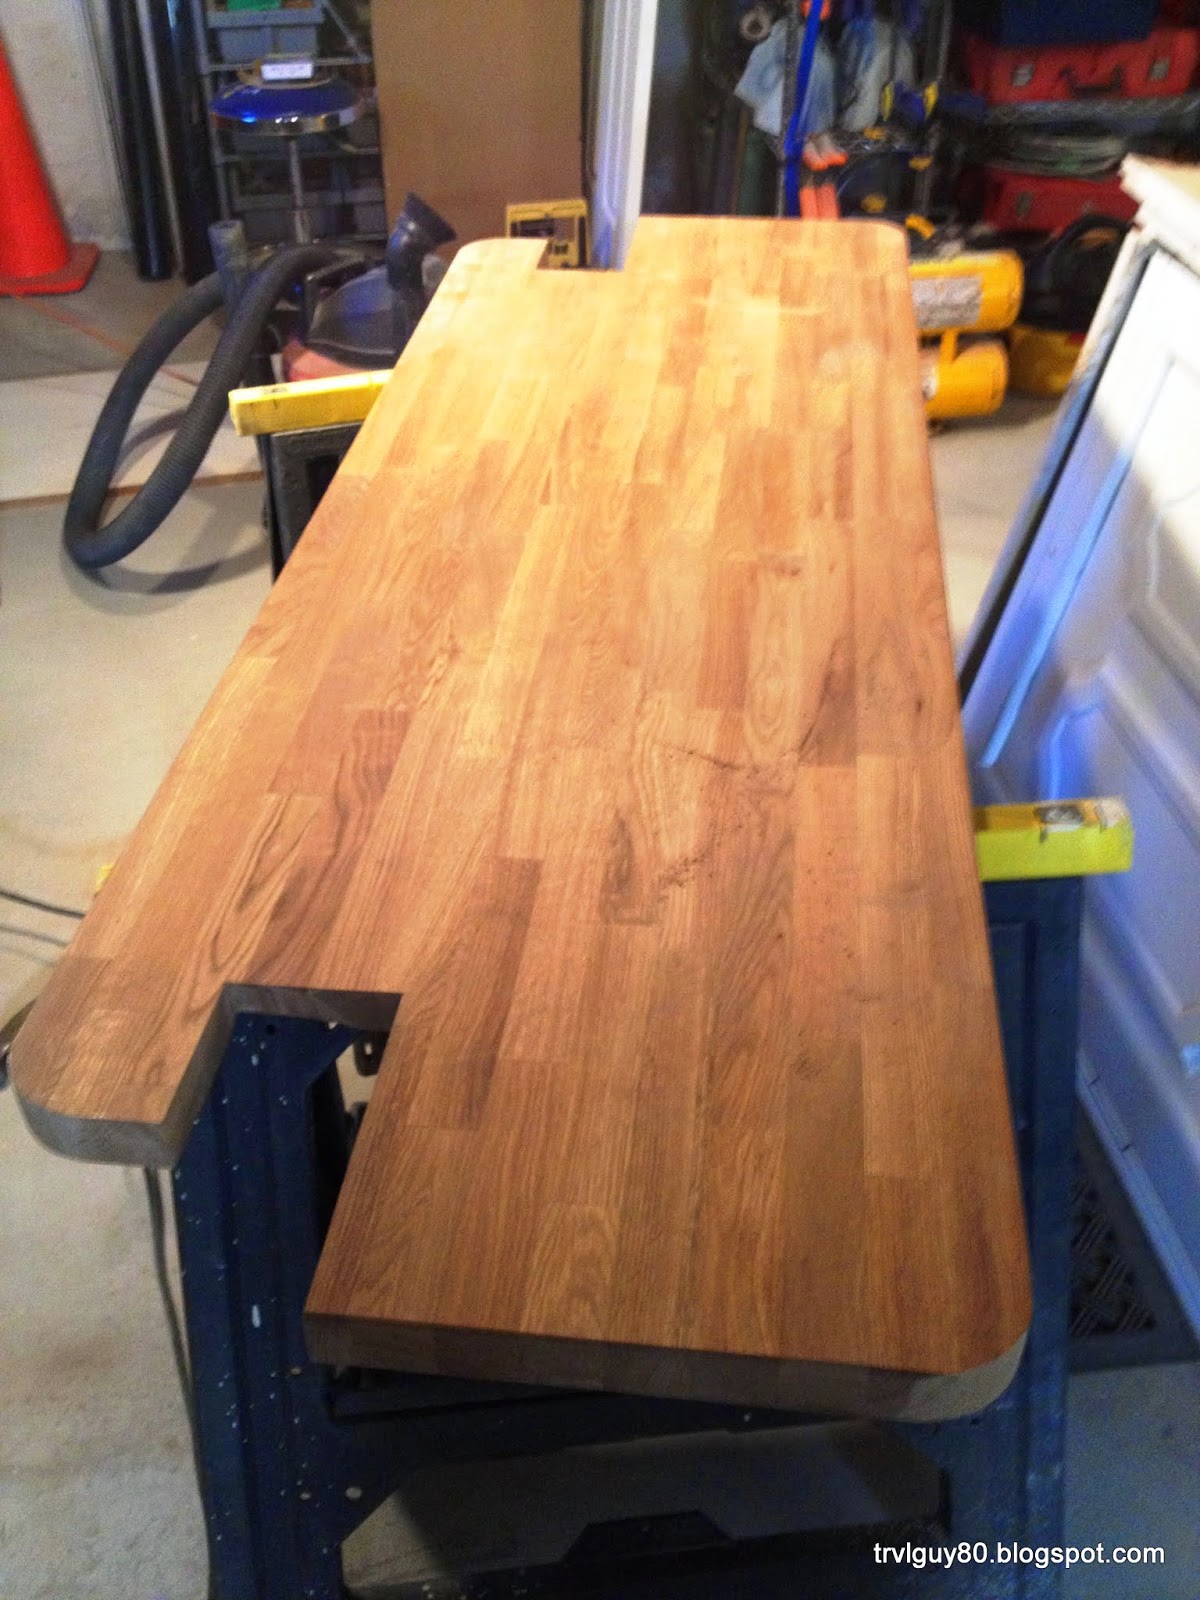
Shortly there after I picked up the counter and a few corbels at Lowes. I spent $129 on the counter $90 on the corbels and $5 on the butcher block oil treatment for a grand total $225. I made a template out of cardboard and once I found the size and shape I wanted it was time to get to work. I brought the counter to his house since he has all the tools and more space to work. We got the counter set up on saw horses and it didn't take long to sketch out the pattern on the counter. 30 minutes later we had the counter shape cut out. Next we used a router to soften the exposed edges. Once completed it was time to dry fit the counter in my condo.

After dry fitting and checking levels it was time to install the corbels that would serve as support. I choose to mount them on either side of the opening where I was sure to hit studs. Next we dry fit the counter again to be sure everything lined up and it looked great. To permanantly install the counter we used liquid nails and applied it liberally to the corbels and to the sill the counter would sit on.

Since it was likely that it might have to support a fair amount of weight such as someone possibly leaning on it with their full body weight I opted to add a mechanical support in the form of a L bracket that would run the full length in the kitchen and be screwed into both the counter and the sill.

I am very pleased with how it came out. With it all installed all I have left to do it caulk it in, stain the surface, and paint the corbels. Shouldn't be too hard or take too long.


Friday, September 21, 2012

Task 67 – Re-Paint my Condo


Transforming my home with paint 3rd time

Painting the interior of a home can transform it from the mundane to the inspiring for very little money. Doing it right and picking the best colors that showcases your home best requires serious planning. While the colors I had were great and created a warm and intimate feel I was ready for something brighter and fresher. Additionally I had added new crown molding, replaced the old boring clamshell baseboards with new speedbase and added a new element to my door frames to give them a more appealing appearance. These additions and replacements combined with 4 years of new furniture layouts and art relocations have left my walls marked up and scuffed. The next big decision is to decide what finishes to use. I prefer flat ceilings, semi-gloss trim and egg shell walls. This combination allows for easier maintenance and a soft and even appearance.

Before starting any paint job it is important to remove all obstacles. Removing the furniture allows you room to move without worrying about getting paint on anything and makes the job go faster. Use drop cloths to cover the floor so you don’t have to spend hours wiping up paint drops or over spray from rollers.

The last few steps before painting is to patch any marks or holes and sand any raised areas. Walls often are littered with small holes from nails used to hang pictures and art work and if the walls were painted with cheap rollers small fuzzy’s get left behind. Once the walls are prepped and ready it’s time to paint them. If you replace any wood or if they weren’t pre primed use Kilz to seal the wood before painting. It goes on like paint and penetrates the wood and seals it reducing the likelihood of any knots showing through your new paint job. Once the room is prepped you are ready to go.

The first step of painting a room is to paint the ceiling. While ceilings don’t get dirty they do yellow over time and while mine didn’t look particularly yellow it was the best time to repaint. I selected a bright white in a flat finish. Most “ceiling” paint is hardly white and I think they look dirty and dingy. Keeping a room bright requires a super white ceiling. Painting over head is harder then painting walls and to get more coverage use a ½ nap roller. Make sure to load up the roller with paint but not over loaded. Coat the roller but when you lift it off the paint tray it shouldn’t have paint dripping off it. This will allow for even and good paint coverage. Don’t be afraid to get a little paint on the walls or the crown molding because you will be repainting that next. Just don’t let any large globs or drips to dry wipe them off quickly. I also believe everything needs two coats. Putting a second coat on ensures that you have an even appearance and no missed spots. Remember to allow each coat to dry before continuing to the next coat. If you don’t wait you will end up with globs of paint and drips. Multiple thinner coats are better than one heavy coat.

After finishing the ceilings the next thing to paint is the molding. I again selected a super white paint but opted for a semi-gloss finish. Using a semi-gloss finish will make the molding shine without being to glitzy and will allow future maintenance to be easier. It lays down smooth and even and can be easily cleaned with a sponge and some soapy water and adds a nice contrast to the ceiling. Again I am a firm believer in multiple coats. Inevitably something is missed and adding a second coat reduces the possibilities of anything being missed.

When choosing a new wall color I wanted something brighter and something that would make my condo feel larger and cleaner. Previously I called my condo a crayola crayon box of colors. Every room had a different color. I felt this made my condo feel smaller and more broken up. Part of what makes my home appealing to me is the large rooms and open floor plan. I decided that I would reduce the number of colors and paint the hallway, living room and kitchen the same color. I opted to paint the bedroom a couple shades darker to keep the warm feeling while maintaining consistency. I had already recently painted the bathroom and decided to leave that color alone. The colors I picked were both Valspar colors, Palomino and Belle Grove Buff.

While I like their colors I do not like their paint and opted to have those colors color matched by Benjamin Moore. Using good paint can make painting a room a much easier work of a job that isn’t exactly fun. Benjamin Moore in my opinion is the best paint. It goes on even and coats well on the first coat. The big box stores advertise paint that primes and coats with one pass. Try it and I promise the next time you paint you will buy a slightly more expensive paint because the quality of the paint reduces the labor.

The best way to paint a wall is to edge first. Edging is when you paint along moldings first. This keeps the rollers away from your freshly painted molding and ensures a perfect line. It takes a steady hand and a good angled brush. Like good paint having the right tools can make the job easier and allow you to finish it quicker. Don’t buy that cheap $5 brush. Instead opt for a natural fiber brush. It will hold the paint better and give you more control. Once you have put two coats on the edge you are ready to roll. This is where the room will start to take shape. It is important to allow each coat to dry before putting the second coat on. Don’t rush the job it will show.


The process was going very smoothly for me except one day when I started the living room I discovered my floor was wet from a clogged A/C drain pipe and a damaged drip pan. Once the drain was snaked, the pan repaired and the plumbing redone the room started to take shape..

For walls you don’t want to use a heavy nap like you did on the ceiling. A finer nap will keep the smooth finish that looks best on walls. A 3/8 nap is best and most paint professionals will tell you so. Like painting the ceiling it is important to put the right amount of paint on the roller. It should be full but not dripping. When you roll the wall out you shouldn’t be pushing hard against the wall. Let the roller do the work. If you are running out of paint go back to the tray to get more. Be sure to go over any paint lines and keep the wall smooth. Work in an organized fashion and be methodical. Start on one fid of the room and work your way around.

Once you finish painting the walls the job isn’t done until everything is back in place. Put your furniture back first and then hang your art. This will limit the need to move art and add more holes then necessary to your freshly painted walls. The feeling of accomplishment and the money saved by doing it yourself will give you great satisfaction. Below are some pictures from my place. I couldn’t move all my furniture out of all the rooms since I just don’t have the space but notice it’s all covered. It also took me a solid week to paint the whole place since I was doing it at night after work.


Sunday, March 18, 2012

Task 66 A - Add trim to doors and replace baseboards

This past weekend I finally installed new baseboards. Previously I have clamshell baseboards and I hated them from the day I moved in. I had decided because of the cost that I would replace them if and when the floors were redone. Well almost 10 years later the floor is the same and as a result the baseboards had never been replaced. I resisted because of the cost but during a trip to Howlett Lumber with my contractor friend Chris I found 16’ 4.3” Speedbase for $8.00 bucks. At $.50 a foot let’s just say that was way too good a deal to pass on and I bought what I needed on the spot.

It took all of a day and a half to complete because I’m slow and there are too many distractions but they are in and they look great. I also wanted to make my door frame’s look a little less plain. I have steal doors and the standard square door frames. I bought a simple piece of molding to wrap around the door edge and used liquid nails to keep them glued to the steel frame since I couldn’t brad nail them. Liquid nails, caulk, and a coming soon paint job should keep them in place for a long time to come.

I’ll post more pictures when everything is freshly painted and you can really see how it looks.

Saturday, January 28, 2012

Task 66 B - Install Bedroom Crown Moulding

Bedroom Crown Moulding

Yesterday I completed one of my home projects. My friend Chris and I installed the last of the crown moulding in my bedroom. It took about 3 hours including cutting, nailing it up, caulking the edges and puttying the nail holes. It went up easier then I thought it would and now just needs a good coat of paint. I am very pleased with how it came out and owe thanks to a good friend and great contractor.

From this project another is born. I have decided to replace all of my base moulding throughout my condo. What I currently currently have is ordinary and for not much money I can make a huge improvement.


Tuesday, November 15, 2011

Clean Out Your Refrigerator Day


This morning while I was putting together my lunch for the day I noticed a few to-go-containers. Given that I am currently in the middle of my month long quest to not eat out I realized that those containers had to be at the very least 15 days old.
It got me thinking I need to clean out my fridge. Funny enough when I got to work and signed online I noticed that today is Clean Out Your Refrigerator Day. I was curious what the origin of this day was but I wasn’t able to find too much information other then suggestions that Whirlpool originally promoted Clean Out Your Refrigerator Day starting in 1995 and was planned for the third Wednesday in November. In 2000 when the e-cards gave it the fixed date of November 15th which has stuck since. In 2004 Whirlpool declared April 4-10 Clean out your refrigerator Week but it seems to have been too late to change the date.  I also found other speculation that it was created just in advance of Thanksgiving to allow room for holiday leftovers.
Why is it important to clean out your refrigerator? The answer is simple. Food like everything has a shelf life even if refrigerated or frozen. The food is only safe and health to eat as long as it is stored properly. Proper storage is the most important thing. Improperly stored foods can become rancid or oxidize, making them more dangerous and can lead to other food spoiling or losing its flavor or texture.
Before I grab my gloves tonight to remove the potential biohazards in my fridge I thought I might share some interesting refrigerator facts.
1.    The ideal refrigerator temperature is between 34-40 degrees
2.    Food experts say that fresh poultry, homemade dips, ground meat etc shouldn’t be stored in the fridge for more than 2 days.
3.    Do not store food in the refrigerator in paper bags instead all food should be covered with foil, plastic wrap or in airtight containers.
4.    Some foods can stay longer in a fridge then others and they include raw eggs and cheese.
5.    Never put a hot pan or hot food in the fridge because it can raise the temperature of the fridge beyond the ideal levels. This can cause other food to spoil as a result of the warmth it releases as it cools down.
So guess what I plan to do tonight. That’s right I am going to clean out my fridge. There are a few suggestions on cleaning out your fridge. It doesn’t just involve removing the expired items.
1.    Take everything out of the fridge.
2.    Wash down and disinfect the inside walls of the refrigerator, the shelves, the draws and along the door seal.
3.    Wash everything going back in even the outside of jars;
4.    Vacuum both under the fridge and behind the fridge. Over time dust bunnies accumulate and can reduce the efficiency of the refrigerator.
So guess what I plan to do tonight. I am going to clean out my fridge of anything that is past its prime or nearly there that I don’t plan to use anytime soon is out for good. Wish me luck that I don't run into any USO's (unidentified shriveled objects).